


Making a needle felted picture is so much fun. If you ever completed a paint by number picture, this seems so similar. The benefit of needle felting over painting however is if you don’t like a particular area you just pull off the fibre and redo the area!
Materials

1. A piece of medium weight canvas (I use one lighter than denim weight). Canvas should be a couple inches larger in length and width than the final picture.
2. A piece of felt, I have used craft felt or wool felt. Some needle felters claim craft felt will buckle too much, but I have not had that issue.
3. Various shades of natural fibre. Here I used natural browns, greys and tan coloured wool and alpaca fibres. I also had different breeds of wool for the creams and whites. The background was shades of dyed blues, purples and greens. Black and white wool was used for adding details.
4. A large felting foam board, or a foam upholstery cushion will work.

5. Felting needles. My preference is a size 38 triangle needle for the bulk of the work, and the 40 gauge for the detailing. Some craft stores sell mixed packages often marked as fine, medium and course. This is a good way to start, then use the one that works best for you. Needles break and do get dull so have plenty on hand.
6. Heat transfer pen. I use the sulky brand, it works really well
7. Electric iron to transfer the image to your canvas.
8. Small scissors. I like the ones often included in a beginner felting kit. Often called thread nippers.

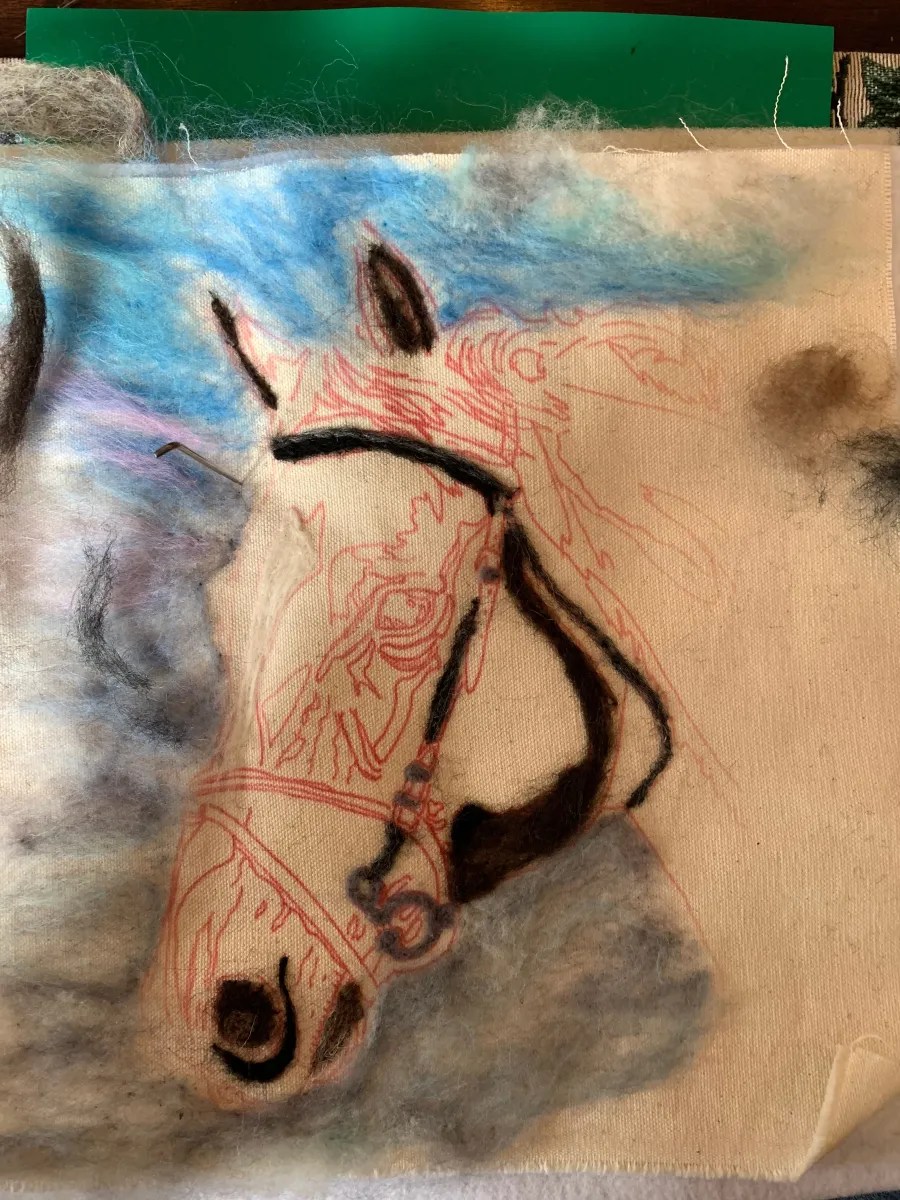
Once you choose your picture, print a black and white mirror image. Mark off all the outer lines and areas of colours such as shadows and highlights with a heat transfer pen.

Cut out a piece of felt and canvas at least a couple inches larger than the size of the desired finished piece.
Using the manufacturer’s directions, heat transfer your image to a medium weight piece of canvas with a heat transfer pen.

Begin adding some back ground colours outlining the main image.
Continue to add background shades. At this stage I tend to go bold with the colours as they will be toned down later with creams and whites.
Begin colour blocking in the dark tones.

Continue to colour block the medium and lighter tones areas.

Continue to add colours to all the marked areas.

Thin layers are added to fill in each marked off area.

Edges of colour transitions are softened by mixing the colours used then felting the mix between the blocked colours.

Continue to fill in areas and blend between the colour transitions. Generally horse hair appears very smooth. To achieve this look continue to jab the felting needle into the fibre until you have a smooth surface. If the horse you are working on has their winter coat needle felt less to keep some fluffy texture

Add the eye. The eye often makes the picture. Using several tones of browns, yellow, blacks and whites are used here.

Begin adding highlights. Highlights reflect shape. They also tell the viewer where the light source is.

More details can be added now to areas like the nose and reins. Adding highlights and shadows builds depth to the area.

Finer detailing can be done now. White fibre will help catch the light and add life to certain areas.

The last addition is the mane. Adding medium and dark browns set side by side gives the illusion of highlights within the mane. A chunky look is achieved by felting long oval shapes of fibre onto the canvas, felting around the outer edges and less in the center of the fibre. This keeps the texture. It is also best to have your fibre run in the direction of the mane hair. Finish up with a few streaks of light brown or golden tones.

Tone down the background adding thin layers of lighter colours. this provides depth rather than just a flat background. Add in some final highlights.

Once you are satisfied with your picture, measure twice and cut once to fit the frame.
Visit Murlo Discovery Channel on YouTube to see a video of the progression of building the picture.
Tips
Blends of fibres can be achieved by grabbing two colours pull them apart over and over again (like making pull taffy) until you get the tone you want.
Some needle felting kits contain top not roving. It seems to lack texture and has a tendency of felting into straight lines. For better coverage of an area mess up the fibres and roll the fibre in your fingers then open it up a bit prior felting it into place.
Just like with painting keep track of where your light is coming from. Highlights and shadows will then be consistent throughout the picture.
The number one rule of needle felting is to have fun. Skills build with practice and you will hone these skills with each project.
Until next time, happy felting!